A MAGICAL WHIMSY

A MAGICAL WHIMSY IS DEDICATED TO PROMOTING DOLL MAKING SITES, MIXED MEDIA SITES, AND CHILDREN'S BOOK AUTHOR'S SITES. PLEASE VIEW MY SIDE BARS FOR VARIOUS LINKS TO CREATIVE ARTIST'S SITES.

Monday, October 24, 2011

Photos of Anne the Angel from the Bella Art Doll workshop in JoAnnA Pierotti's Moss Hill Studio Blog

 I thought some of  you would like to see more photos of Anne the Angel, the one I used for my profile photo. This is Anne the Angel which I made in JoAnnA Pierotti's Bella Art Doll workshop in the fall of 2008, in her online Moss Hill Studio blog.
The members of the workshop could use any type of embellishments for their dolls.  I chose mosaics for the base and vintage crocheted items for the hat and front and back wings. 
I glued a vintage button onto the crocheted piece on the back of the doll.
JoAnnA's online workshop showed videos of how to make the dolls.  She has several secrets to the success of making these stunning altered dolls.   I do have an interesting story to tell.  I had found JoAnnA's blog which can be found at :  http://www.mosshillblogs.com/    Anyway, I was unable to find her blog for another year!  And then I found the booklet Exhibition 36 which had two or three pages devoted to JoAnnA making this very doll and simple instructions on how to make it.   But I knew there had to be more to the making of the doll and the Moss Hill Studio blog site was listed in that publication, along with many other very talented altered artists works and instructions.  That is when I found out JoAnnA was giving an online workshop for the Bella Art Doll.  JoAnnA has other workshops to take such as her soldered embellished bottles.  You'll just have to take a look at her blog. She is always making something to sell in her Etsy shop or she also goes on location in various artists retreats to teach her altered art designs in person across the country. Enjoy!


Wednesday, October 12, 2011

Photos of the doll I made in Cloth and Clay doll ning in 2008

YES, SHE HAS A POUTY FRENCH LOOK TO HER.
YOU CAN CLICK ON THE CLOTH AND CLAY DOLL NING SITE BUTTON ON MY SIDEBAR FOR INFORMATION ON HOW TO JOIN JANE DES ROSIER'S DOLL CLASS.  ENJOY!!!
I enjoyed making this doll so much.  It was tedious work, first cutting out a cloth doll body, arms, legs, then stuffing very firmly.  Then using Creative Paper Clay to sculpt the three or four layers of clay for the face and sanding, and letting the layers of clay dry in between.  Then painting the face, hand, feet, and body.  And also making a very sweet dress for the doll.  The possibilities are endless as to how you can dress and make your doll look charming.  Many of the doll makers in Jane's class have gone on to having their dolls featured in Art Doll Quarterly and in PRIMS, two publications by Stampington, Inc.   Stampington has doll challenges for both publications where doll makers can submit their dolls for challenges and for normal submissions for dolls to be featured in their publications.  When making Jane's doll pattern, she has some secrets up her sleeve for making her dolls.  Her class can still be joined for $12 per year which includes all of the video tutorials, and extra doll making tutorials and doll making tips.  With your own page for posting your doll photos related to the site.  And other pages for discussion forums, and a forum for posting you blog name along with others who want to discuss and post their doll related sites.  It is just a great place to be!

I used the opportunity to make my doll over a three day weekend when my husband was on a trip, and I worked probably eight hours a day on my doll.  It was tedious work but richly rewarding.  I love this style of doll as it reminds me of a marionette.

Tuesday, October 4, 2011

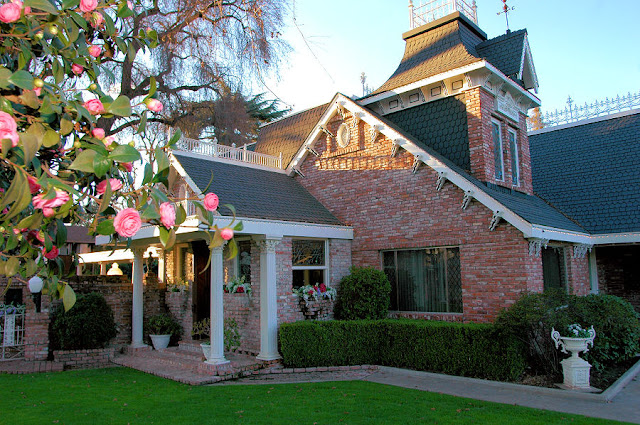
It's Time For More Photos of Laurelwood...Our Victorian Home

This is the front walkway.
This is the right side of the house next to the master bedroom.
This is a view from the next door neighbors of the right front side showing the upper balcony door.  There used to be an outside staircase and we intend to replace it.
This is a view of the Widow's Peak and the left side iron work.
This is a photo of the left side door.  Beautiful woodwork indeed!
These are the double front doors.
This is a shot of the left side of the house.
This is in the very front lawn under massive oak trees.
This is a distance shot, showing the massive trees, the entire house and front grounds and the garage which is a masterpiece in itself.
This is a gazebo in the backyard.
This is a photo of the back door and back patio.
This isn't the most beautiful shot, but it shows the rose beds and part of the garage.
At the first part of the year we had an opportunity to purchase a house at foreclosure, and what a house it is!
I think these photos shows most of the outside of the house and grounds.  I will next time, post photos of the interior of the house.  And we are in the middle of remodeling the entire upstairs into three bedrooms.  There are approximately 23,000 bricks that were used in the making of the house and flower beds, and back patio.
ENJOY!